How to Use This Blog

Since we have lots and lots of videos here, you will need to know the best way of finding what you are looking for. Each post has the video(s) of the topic it is about. Sometimes there will be more than one video that is a continuation of the previous one. These videos will be posted together within the same post. To find what you are looking for, either use the search box or the list of categories posted in the right column.


The IQ system is constantly evolving, so please keep in mind that some of the older videos may show features that have been replaced by newer ones, or buttons that have changed position or names. However, the videos have not been removed because the methods demonstrated are still valid.


Showing posts with label pantographs. Show all posts

Friday, August 29, 2025

Baptist fan panto - step by step guide.

There is no need to buy a baptist fan panto - iQ lets you create your own, customising it to suit your needs. 

Here are the step by step instructions.

Start at the main menu.

Design/Sew Quilt.

Start new. Answer the pop up questions appropriately to suit you.

Block Pattern. This may seem to be the wrong choice, but you are designing your own pattern now before saving it to use as a panto.

Enter block manually. Since this is design work, the 10" by 10" block will be good. Continue. Finished.


Select the Computer Art Patterns catalog.

Select Baptist Fan, Continue.


Now look at the choices. You are creating a panto. Look at the number of Arcs - you can change that to any number you want. Consider - do you want lots of arcs closely spaced, or fewer arcs so you can make the rows smaller in height? Think about the quilt you'll be working on. I changed from 10 to 5 arcs by touching the minus sign - or you could enter the number using the key pad. Finished.


iQ has put your pattern in the block but at the 100% size you just created. Mine was way too big so I scaled it down. If you want to save this pattern at the scaled down size, touch Update to reset the scale to 100%. Finished.


You now want to save the pattern, so look for save. It's not on this screen so touch Finished.

 Save Quilt/Pattern.

Save A Pattern From The Quilt.

Touch the pattern, as instructed. Continue.

Give your pattern a name then save it to the catalog of your choice. I created a new one named Baptist Fan. I'll probably save more versions with different numbers of arcs and at a different size for future use.


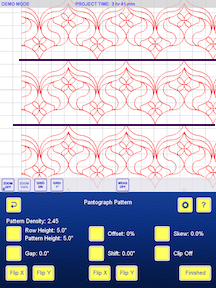
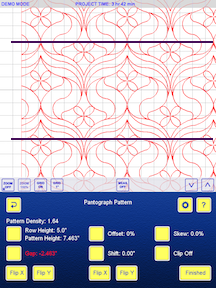
Now you can use this saved pattern to create a baptist fan panto on your quilt. 

Select pantograph.


Enter the dimensions of the quilt.


Select your Baptist fan for both the odd and even rows.


Here's how iQ will initially set it up.


I closed the gap and altered the row height.


Clamshell - step by step.

There is no need to buy a clamshell pattern - just use the geometric catalog to create your own. Follow these steps:

At the main menu select Design/Sew quilt.

Start new. Answer the pop up questions to your liking.

Pantograph.

Enter rectangle manually.

Enter the size of your quilt. Continue.


Check that the dimensions are correct, then touch finished.

Select the geometric catalog. Find half circle and touch it to select for the odd rows. Continue. 


Find half circle offset and touch it to select it for the even rows. Continue.


You'll see that iQ has made the rows 12" high, as usual. Change this to suit your needs.


All done - your clamshell quilt is now ready.


Monday, February 3, 2025

Fooling IQ on where to start

Did IQ ever think it finished a row, but truly hasn't due to a thread break or some other reason? This is how you get it to start in the correct location.

Here's help from Patty on how to restart a panto row in the place you want it to start.

Thursday, August 24, 2023

Pantograph pattern editing and modifications explained.

In this video, Tracey Browning clearly explains all the editing features available when setting up a pantograph. If you are a new iQ owner, this video will help you understand all the different ways in which a pantograph pattern can be customised.


Tuesday, June 27, 2023

Sunburst Panto

In this video Sonya shows how to create a Sunburst Panto on IntelliQuilter. The tools used include fan pattern, split pattern, clipping block...


This is a very good demonstration lesson to follow step by step but if you prefer not to do that, Sonya has kindly made her patterns downloadable for you. The patterns made in the video can be downloaded from Sonya's blog at this link https://tinyurl.com/ycxu4875

Monday, June 26, 2023

Using a clipping block for a Grandmothers Flower Garden quilt.

In this video Sheridan demonstrates how to use a clipping block for the last pass on a Grandmother's Flower Garden quilt so the pattern does not stitch off the edge of the quilt top. The video does have a few shakes with the camera but the material covered should be worth it.


Sheridan Carter is an APQS and IntelliQuilter dealer and educator.

Sheridan Carter's Favorite No Sew Zone Method

There's lots of nuggets of information in this one. No sew zones can be created with less over stitching by using stop and tie off as the transition. Splitting the pantograph will give you a built in stop so you can add a no sew zone block inside the body of the quilt. Another option is to utilize the speed of your presentation clicker to stop IQ. This method allows you to back up and add the blocks. It's so much fun and very successful. Try it and see which is your favorite! Sheridan Carter is Representative for APQS and Intelliquilter. She teaches in her studio and travels to locations where teachers are not available.Reach out to discuss attending one of her classes. skquilts@gmail.com Public classes are listed on skquilts.com and private classes are.... well private.


Wednesday, November 2, 2022

Intelliquilter Adjusting the Bottom of the Quilt with Clip or Tweak

Sheridan will explain in this video how using Clip at the bottom of the quilt is preferable to Tweak. Tweak is a fabulous tool but may not be the right choice when you have a large design that exceeds the area that you need to quilt. Follow along as Sheridan walks you through the process on her APQS Freddie. Visit Sheridan Carter at Sheridan Kay Quilting in beautiful Hendersonville, NC for information or a demo on Intelliquilter.

Restitching with Intelliquilter

Sheridan Says... There are many ways to accomplish things with Intelliquilter! In this video, I replace stitching that had to be removed. I show how to restitch after reloading the quilt. Next we realign and restart. Restart allows me to start exactly where I needed to. Splitting the pantograph allowed me to change the direction of the stitching. I chose to reverse the direction and I matched up exactly where I tied off the thread from the unsewing. Intelliquilter is wonderful. If you would like a demo or more information contact Sheridan at skquilts@gmail.com


Wednesday, March 16, 2022

Using Tweak to adjust pantograph patterns, by Jessie Zeigler.

This link will take you to Jessie Zeilger's blog where she demonstrates how to use Tweak to adjust pantograph rows to make them interlock perfectly.

https://www.longarmleague.com/blog/tweak  

Tips for Precise Alignment of pantograph rows from Jessie Zeigler (Longarm League)

I recently came across Jessie Zeigler's blog and web site. She uses an iQ and has great video demos as well as written help for all longarmers.

This link will take you to a post with tips for precise alignment of digital patterns. 


Thursday, March 10, 2022

Row height and Pattern height.

Row height and Pattern height and the relationship between the two can be confusing. The most important number is always Pattern height. This should never be greater than the distance the throat space of your machine allows you to stitch before needing to advance the quilt. In my case, with an 18" Gammill Premier, I cannot quilt more than 11" safely. 

Row height is the only number that can be changed by using the keypad. Changing the row height simply changes the scale of the pattern and therefore the number of rows, as shown here. The first screenshot shows the row height at 12", so there are only 5 and a bit rows on this quilt. The second screenshot shows a reduced row height of 5", which increases the number of rows and scales down the whole design.


Pattern Height is a combination of Row Height and Gap, or to put it mathematically correct, pattern height = row height - gap. 
Pattern Height only changes when the gap, or space, between the rows is either increased or decreased. This usually happens when the pattern needs to nest, like this pattern. In the first screenshot below, you can see that row height and pattern height are the same, but there's too much empty space. The rows are all 5", with no overlapping. The black lines define the rows. There is one row between them. 


In order to get rid of that empty space, the pattern needs to nest. This is done by changing the Gap.

As the Gap is closed, the pattern nestles into place. You can see that the Gap button is highlighted in the screenshot below. It is being changed by tapping the down arrow, or by sweeping the screen. The rows are now overlapping - the black lines here still define one row, but it has now overlapped the rows above and below it. The pattern is filling the space. In the process its scale has changed - it has become larger.


Look at the numbers - Row Height combined with Gap is the Pattern Height, or specifically in this case where it's hard to see the numbers on the screenshot 5"- -2.463" = 7.463". (the double negative becomes a plus.) 
In the rare event that the gap is increased, spreading the rows apart, the gap number will not be a negative. 

Changing the Gap, changes the Pattern height.

If the Pattern height is too great after altering the Gap, touch the Row height button and decrease it until the Pattern height is suitable for your machine. Decrease it by either tapping the minus button, sweeping the screen or by using the keypad. If you are a good mathematician, you will be able to enter the correct number on the keypad to get the pattern height you want. (In my case, I just keep guessing.)

Always watch the Pattern height.


Saturday, February 12, 2022

Matchmaker Table runner - An Urban Elementz video

This is a complete project, piecing and quilting. The iQ quilting starts at about the 19 minute mark.
The "Matchmaker" by Melonie Caldwell is stitched. It is available at urbanelemnetz.com.

Winter wonderland tree skirt with Merriment - An Urban Elementz video.

This video was made by Urban Elementz.  The Winter Wonderland Tree skirt is being finished with iQ. "Merriment" pattern by Patricia Ritter and Leisha Farnsworth is being stitched. This digital pattern can be purchased from urbanelementz.com.


Sunday, August 1, 2021

Adding Width to the Quilting Design after Starting the Quilt, by Sheridan Carter.

Oops there's been a mistake. The quilt on the IntelliQuilter screen is smaller than the one that's on the frame and this video will show you how to correct the problem.

Properly Shutting Down, Saving Needle Position and Restarting a Panto, by Sheridan Carter.

Join Sheridan Carter as she takes you step by step through saving your needle position, saving your project and properly shutting down. . Next, you are guided through restarting.

Using Adjust when Stitching a Panto

Adjust the edges and include a pause marker to allow Intelliquilter to assist you! Never quilt too far off the edges or stop short of the quilt you planned. Adjust is the perfect answer and it so easy.


Tutorial for Setting up and Saving a Pantograph or E-2-E, by Sheridan Carter

Sheridan Carter takes you step by step in setting up a pantograph on the ClassIQ. Follow along and get comfortable using the IQ tablet off the frame to design and save a quilt to be stitched out later.

Sunday, July 22, 2018

How to set up and stitch a panto on a large, non-rectangular quilt.

Thanks to Connie for making this very clear video showing how to set up and stitch a panto on a non-rectangular shaped quilt. This was video made in response to a question asking how to stitch a large octagon shaped table runner.

Tuesday, January 2, 2018

How to create your own modern panto.

Many modern pantos have a design that goes the full width of the quilt. These can be tricky to set up and I've shown how to do that using a repeated block pattern in another post. Panto only versions of iQ cannot use that method but this one should work for you.

Follow these steps:
Design/sew quilt > start new > pantograph > enter rectangle manually.
For this example I entered 75 x 90. If you want to save this quilt to use as a master, make it as big as necessary.
Continue > finished.
Select the geometric catalog and choose arc-2 for your panto.
This is what it will look like.


NOTE: if yours doesn't look like this, you need to change one of the settings, so touch the gear button (local configuration) up there by the help button, and the first preference listed is Line Up Start/End Points. If it says disabled, touch the button beside those words, then touch the plus or minus sign.
Your panto should now look like mine.

Whilst you're at the configurations, look at the choice for progressive offset. If it says disabled, touch the words and then the plus sign to change it to enabled. Finished.

Change the row height to 1".
Now play around with the gap setting, the offset setting and the skew setting to see what you get. Here are some of the patterns I got. Look at my settings to replicate them on your tablet. (Click on the image to increase its size) Save the one you like the best as a quilt. Start again from the beginning to create some variations if you wish. By the way, you'll notice I always offset the pattern to the right, but ofcourse it can be offset to the left if you prefer.