Here's another great video by Connie showing how to she created a design for her quilt using the spirograph pattern in the computer art pattern catalog.

How to Use This Blog
Since we have lots and lots of videos here, you will need to know the best way of finding what you are looking for. Each post has the video(s) of the topic it is about. Sometimes there will be more than one video that is a continuation of the previous one. These videos will be posted together within the same post. To find what you are looking for, either use the search box or the list of categories posted in the right column.
The IQ system is constantly evolving, so please keep in mind that some of the older videos may show features that have been replaced by newer ones, or buttons that have changed position or names. However, the videos have not been removed because the methods demonstrated are still valid.

The IQ system is constantly evolving, so please keep in mind that some of the older videos may show features that have been replaced by newer ones, or buttons that have changed position or names. However, the videos have not been removed because the methods demonstrated are still valid.
Sunday, July 22, 2018
How to set up and stitch a panto on a large, non-rectangular quilt.
Thanks to Connie for making this very clear video showing how to set up and stitch a panto on a non-rectangular shaped quilt. This was video made in response to a question asking how to stitch a large octagon shaped table runner.
Saturday, July 21, 2018
Fan Pattern
These step by step notes are just a taster, but should get you started playing with fan pattern and creating your own designs. I haven't included screenshots for the first example to encourage you to follow the steps to find out what happens.
Here's another idea to try.


 Betty Flower
fanned
Betty Flower
fanned
Note – pay attention to the
number of repeats – sometimes a pattern may appear to have five repeats, for
example, but may in fact have more because they are right on top of each
other. When stitched, they will
show up as double stitching.
Many of the simple shapes in the geometric catalog make very interesting patterns when fanned. Take a few minutes to play and explore.
Simple shapes can
be fanned to make very interesting patterns. Change the angle and number of
repeats. Moving the pivot point,
which is the start point of the pattern, can really change the fan patterns.
Follow these step by steps as an example.
Place arc-2 from the geometric catalog in a block. Select add pattern, fan
pattern.
Set the angle to 1º, repeats 20.
Select Alternate then touch the + or – sign to see what
happens.
Now touch the start point (the pivot point) your stylus move the it around.
Change the angle to 10º. Move the pivot point again.
Change repeats to 36.
Keeping the transition continuous joins the individual
pattern repeats in the fan.
To quickly generate a pattern that will fill a quarter
circle, a half circle or a full circle, select Sweep then touch + or – to
change the selection.
Touch all the buttons to find out what they do. If you happen to create a pattern you really like along the way, touch finished then find save pattern and save your creation for future use.
Back out and change the pattern to Fleur de Lis (Patterns by
Helen)
Repeats 6. Angle 60º.
If you want to change the pivot point on a closed pattern,
go back to the modify pattern page and move the start/end point. (Touch the button that says start/end, and drag the S/E to a position you prefer.) In the second and third screenshots below, I moved the start/end point of Fleur de Lis.
In the third screenshot, I also moved the pivot point.


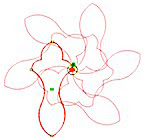
Back out and change the pattern to Betty Flower.
Repeats 8. Angle 135º. Move the pivot point around until you
see the pattern pictured below.
Touch Close Pattern, then the + or – sign to see what
happens
 Betty Flower
fanned
Betty Flower
fannedMany of the simple shapes in the geometric catalog make very interesting patterns when fanned. Take a few minutes to play and explore.
Subscribe to:
Posts (Atom)